Cyanotypes and Digital Negatives by Christopher John Ball

Tweet
The invention of the Cyanotype process is accredited to Sir John Herschel, the Astronomer Royal, in 1842. It is believed that he developed this process so as to be able to make accurate copies of his designs, calculations and notes. Artists were initially employed to copy the designs by hand but Herschel became dissatisfied with the mistakes and the resultant inaccuracies that arose and so the 'Blue-print' came into being.
It did not take long for the process to be exploited by photographers after it was found that it could be used to produce prints from continuous tone negatives, provided that they exhibited plenty of contrast.
The Cyanotype is a printing out process using an ultra violet light source. It is one of the oldest and most permanent printing processes still in use by Fine Arts Photographers and it is the simplest ‘alternative’ photographic process to undertake.
Nude studies are excellent subjects for making cyanotypes. The brush strokes in the coating process produce edges that give a unique look to each print and the surface texture of the water colour paper becomes part of the final image to create a subtle aesthetic. Cyanotype image making is a fun process that affords the photographer of the nude a creative outlet that combines the digital technologies with historical processes to produce unique photographs with a hand made organic look.
Cyanotypes are produced by contact printing a negative therefore the final image is the same size as the negative. This meant that to produce a print of a decent size required a large format camera.
The arrival of quality inkjet printers has removed that necessity. The photographer can now shoot on any film or digital medium and then produce a negative via inkjet means to the required size.
Making the Digital Negative:
I favour making negatives via an inkjet printer and printing out to the desired size onto Overhead Projection Film
. Inkjet negatives give the photographer greater control over the finished image. You are free to make whatever alterations to the negative (dodging, burning, cloning, cropping, convert colour images etc) that you wish in the image manipulation software of your choice.
Pictorico transparency film is recommended by many practitioners as it has a gelatine and ceramic coating which has superior ink holding properties to standard OHP material, but feel free to experiment with other manufacturers as this isn't as widely available as it used to be. Look for a good quality overhead transparency film from a respected manufacturer.
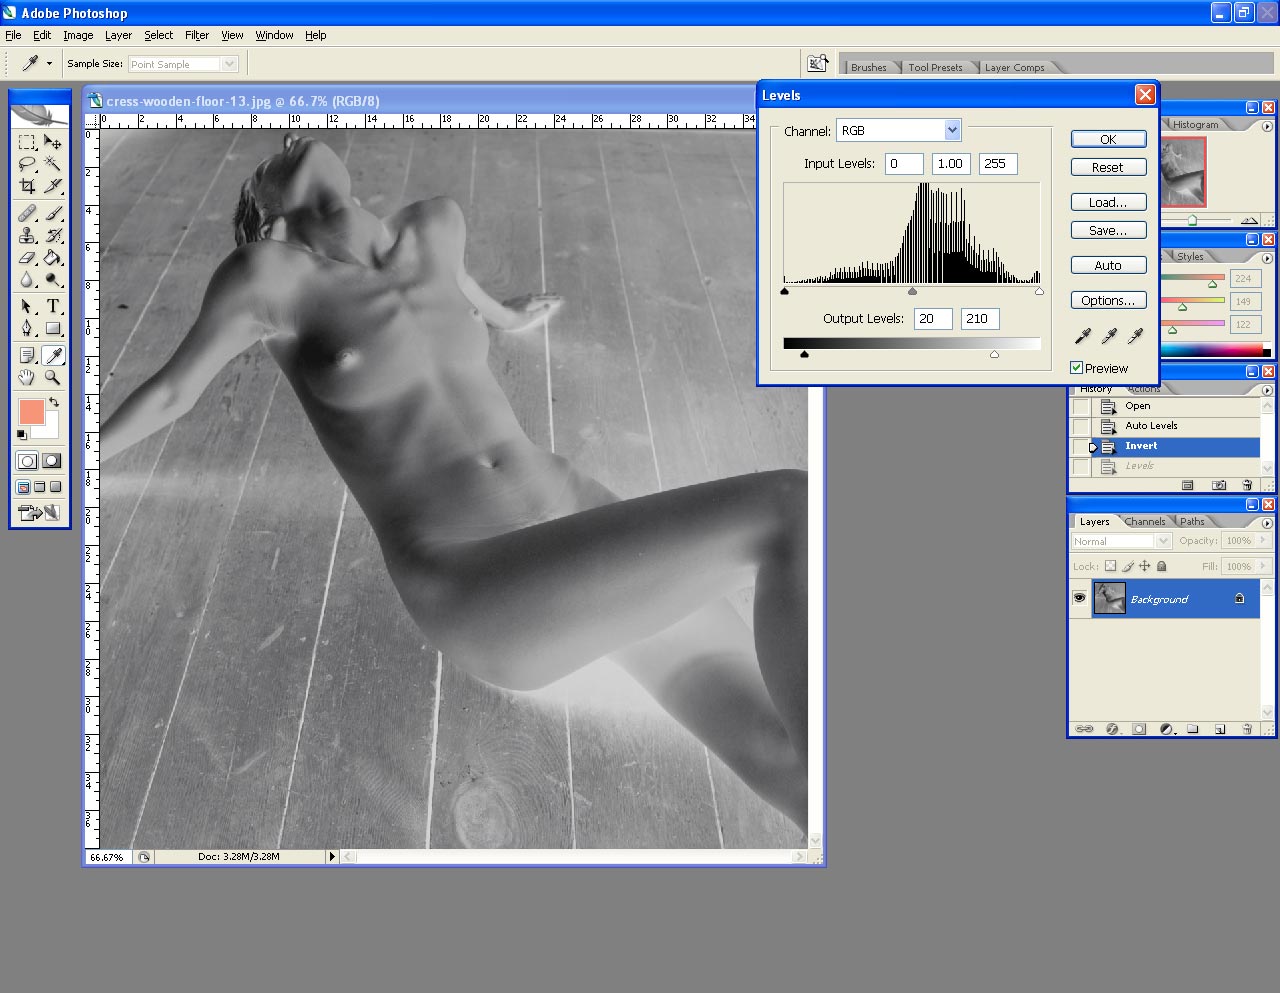
Select the image that you wish to make a negative and go to Image>Adjust>De-saturate. Next you need to turn the image into a negative. Do this by going to Image>Adjust>Invert. To alter contrast go to Image>Adjust>Levels. In levels adjust the Output with the bottom sliders from 0 to 255 to about 20 to 210 (fig 1). This is a starting point and you may find that, after experimentation, other settings suit your images better.
You could print the negative at this stage but I recommend filling the image with another colour. Rather like the orange mask used in colour film negatives - using your software’s fill command. This allows for a denser negative as the additional colour adds ink.
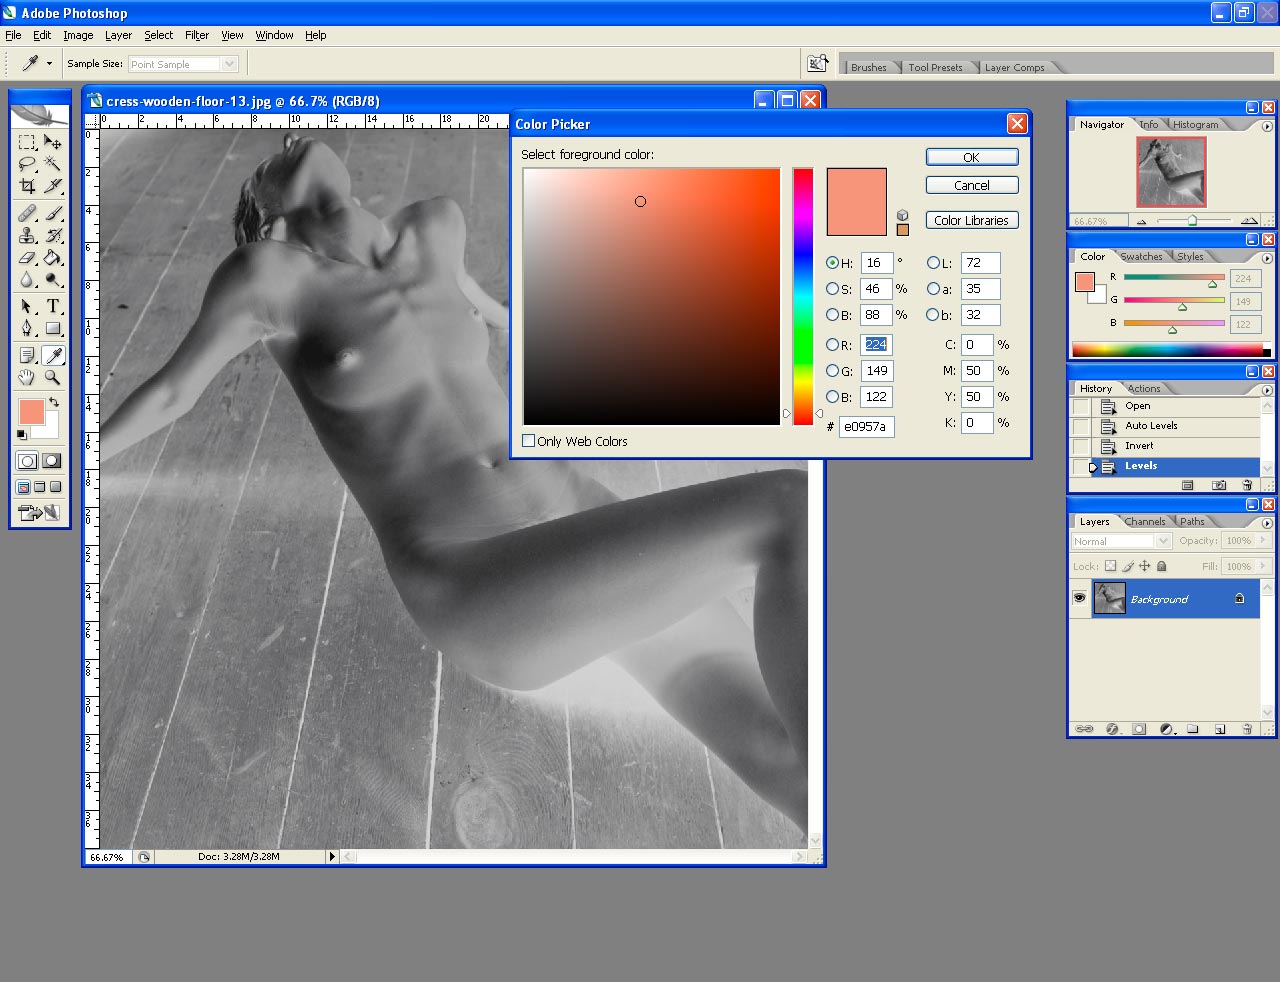
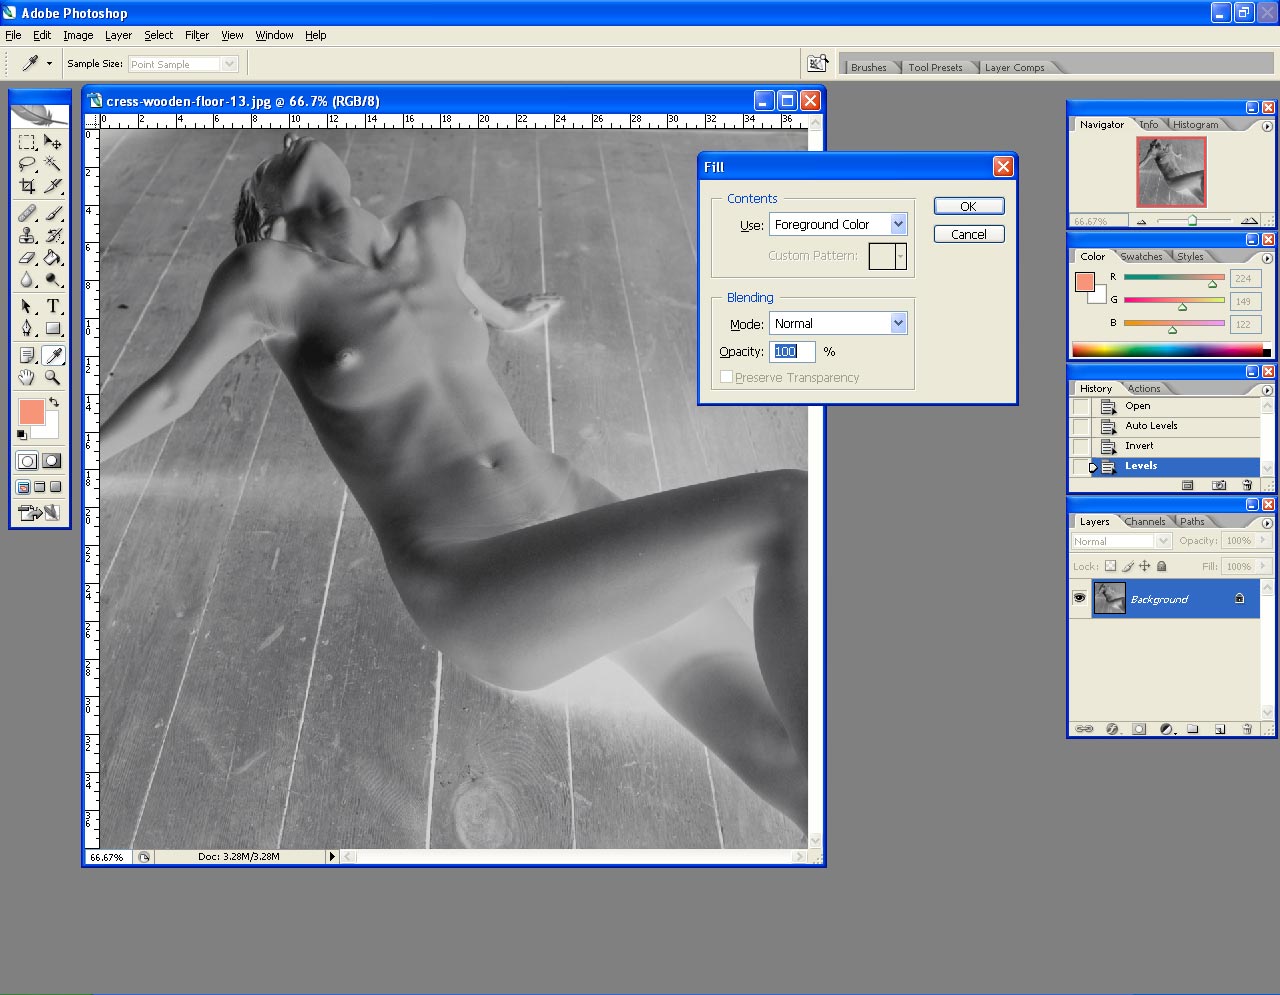
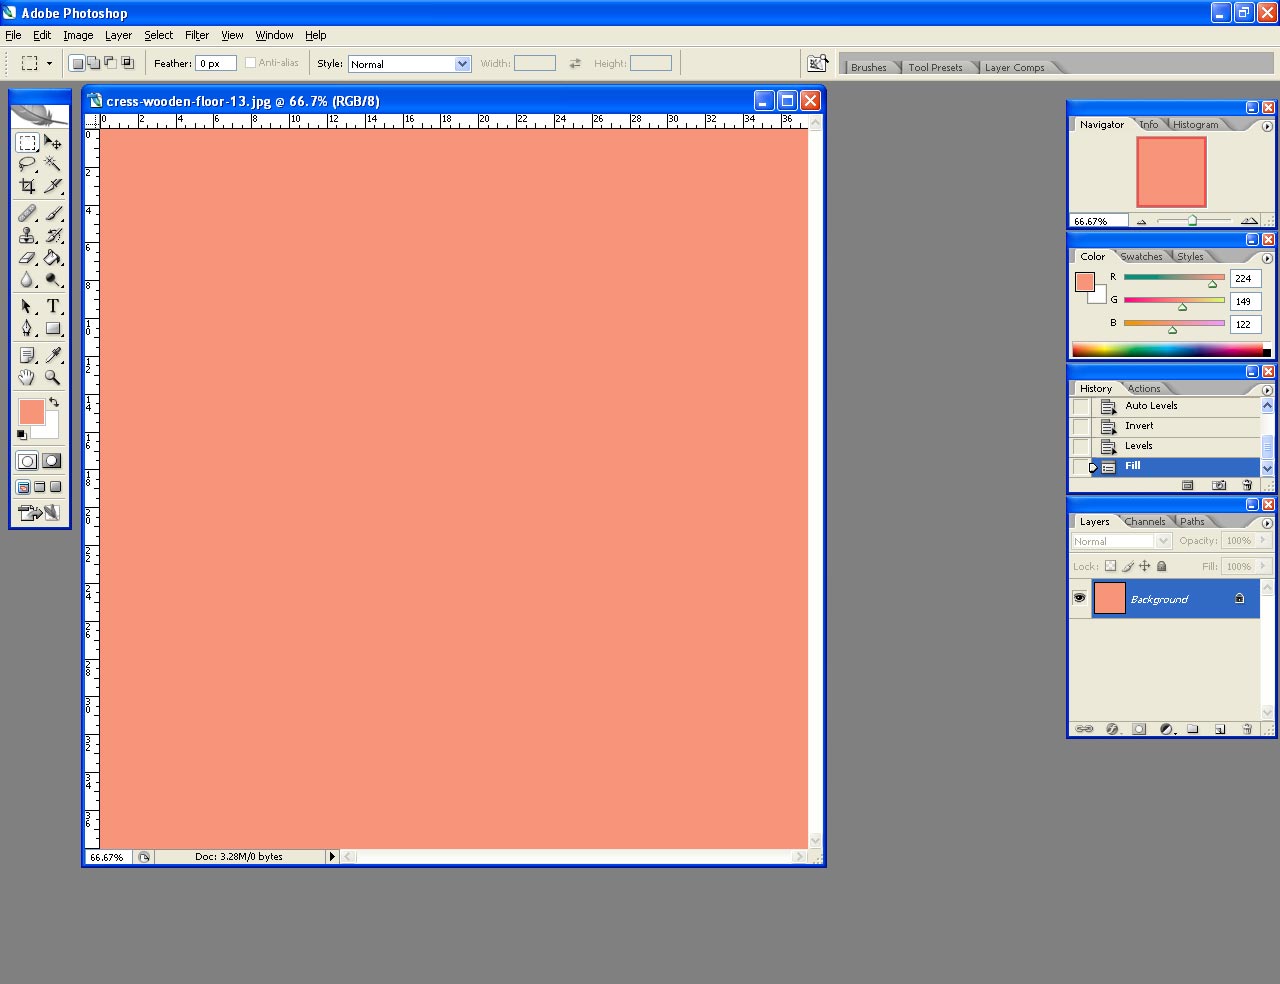
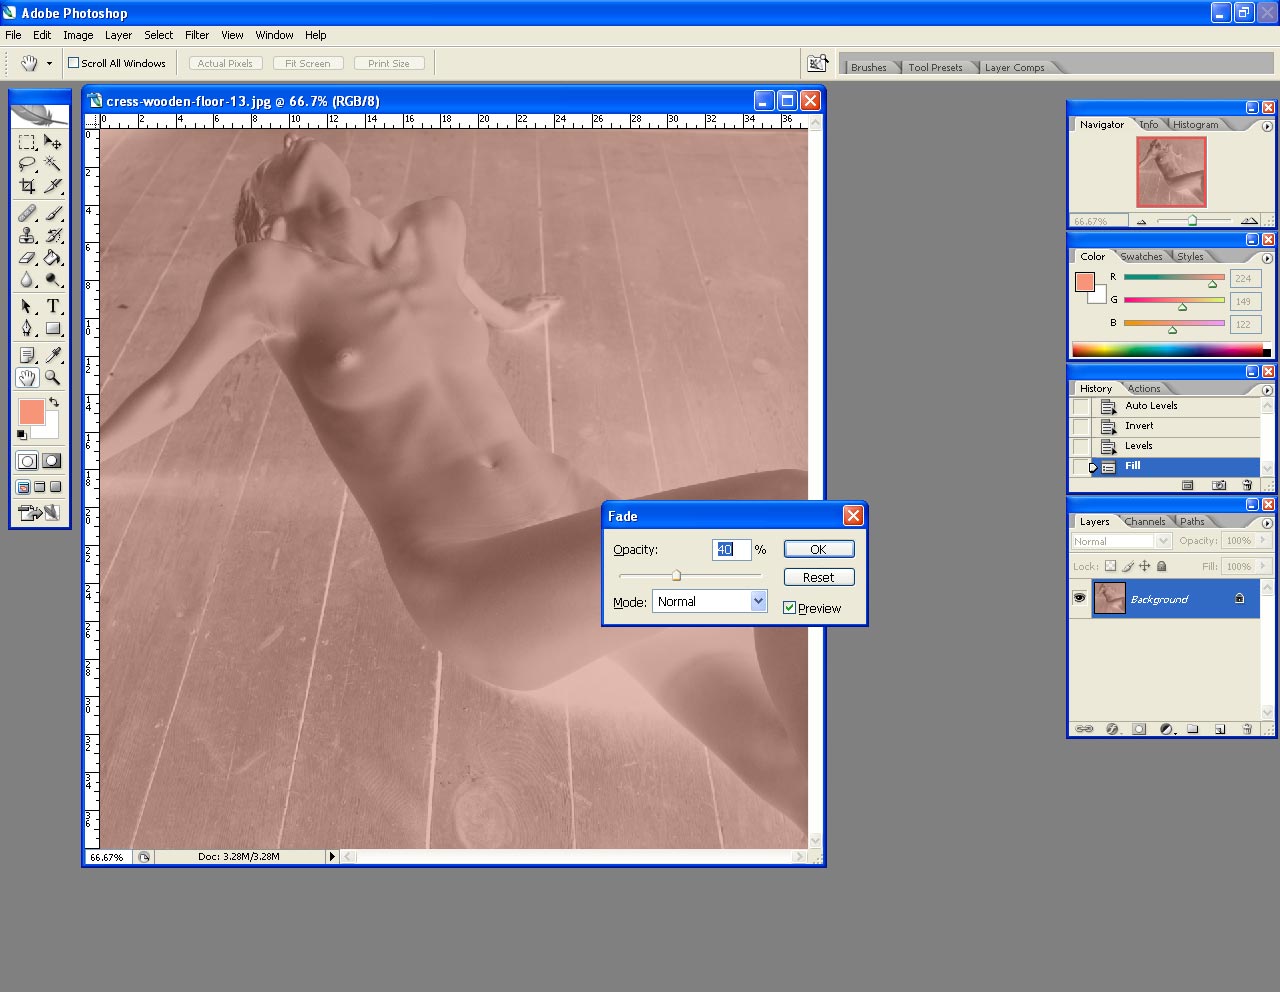
From the Toolbox select the foreground colour icon. The colour picker box will open. In the C.M.Y.K % section change the settings to C=0, M=50, Y=50, K=0 (fig 2). This will produce an orange colour in the Foreground Box similar to the orange cast found in colour negative film. Click OK. Now go to Edit>Fill. Select OK (fig 3). The image will turn completely orange (fig 4). Next go to Edit>Fade Fill. A dialogue box will open. With the Mode setting left at Normal – slide the Opacity slider until it reaches 40% (fig 5). Click OK. You may want to experiment with the percentage but 40% is a good starting point. Save your work.
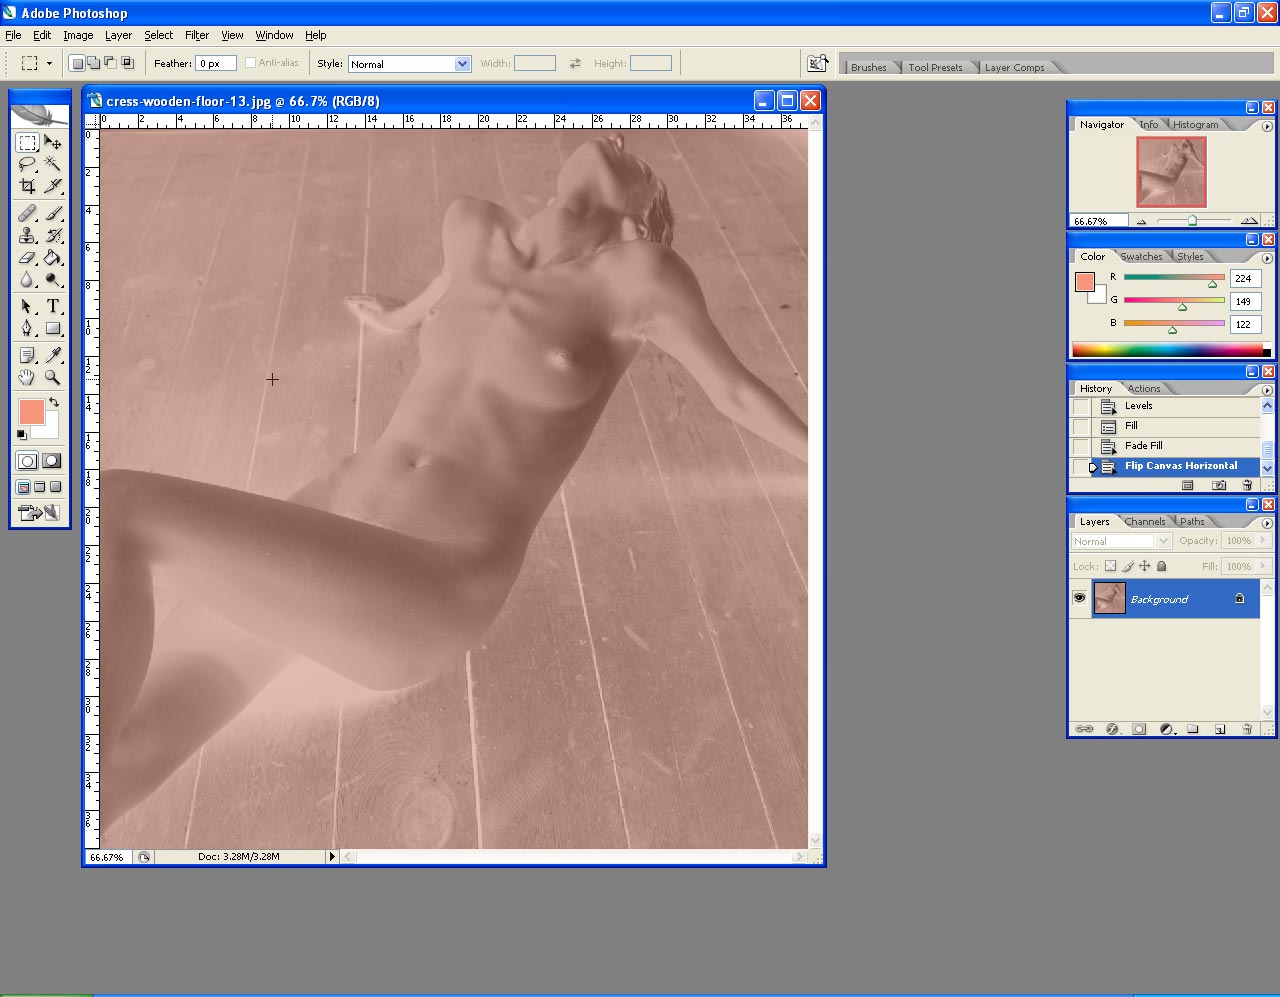
The final stage is to flip the negative image horizontally (fig 6) – if you fail to do this your image will appear as if in a mirror.
Finally print, at your printer’s highest resolution onto your OHP transparency. Handle the negative carefully by the edges and hang it up to dry and harden away from dust.
Paper: Whilst practically any paper can be used to make a cyanotype print most photographers favour using a quality acid free watercolour paper of about 300gms in weight. The beauty of the cyanotype process is that you can experiment with differing paper surfaces and tones - try an off-white/cream or ivory paper.
Lighting Source: Traditionally the sun was used as the light source but an artificial UV source may prove to be more controllable. I uses a small facial sauna. This 'mini-sunbed' has the dual advantage of being a constant source of UV and of having a built in timer. This allows for more accurate and repeatable exposures.
Printing Frame: A rim-less clip frame, of the sort used to display posters, can be modified for use as a cyanotype printing frame. Cut the backboard of the clip frame in two about half way and tape these two parts back together with heavy-duty tape to form a 'hinged' back. The frame can be opened as normal to load your paper and negative, and then clipped back together, using 4 large ‘bull-dog’ clips, to hold the two in register while you make your exposure. To check the progress of the print, simply remove 2 clips from the top half and 'open' the hinged back. The remaining clips ensure that the negative and paper stay in register.
Materials
1- Digital Scale with at least 0.5 g. of accuracy.
2- Two brown medicine bottles of at least 150 cc each. To hold solutions A and B
3- Rubber or latex gloves.
4- 250cc glass beaker.
5- Japanese calligraphy brushes (Hake – brush without metallic ring)
6- UV light source or sun.
7- Contact printing frame.
8- Developing trays larger than the size of the sensitised paper being used.
9- Water Colour Paper – Acid free 300gms
10- 500ml measuring cylinder
11- Plastic clothes pegs to hang paper to dry.
12- OHP transparency on which to print the negative.Cyanotype Formula
Formula OneSolution A 20 grams Ferric Ammonium Citrate (green) + 100ml water at 22C.Solution B 10 grams Potassium Ferricyanide + 100ml water at 22CTo Use: mix equal parts of A and B. Has limited shelf life when mixed
Formula TwoSolution A 20 grams Ferric Ammonium Citrate (green) + 5 grams Oxalic Acid (HIGHLY TOXIC) + 100ml Water at 22CSolution B 10 grams Potassium Ferricyanide + 5 grams Oxalic Acid (HIGHLY TOXIC) + 2 grams Ammonium Dichromate + 100ml Water at 22C.To Use: mix equal parts of A and B. Has limited shelf life when mixed
Procedure
1. Mix equal parts of ‘A’ solution and ‘B’ solution. The chemicals become sensitive when mixed together. Stored separately the chemicals keep well but once mixed the solution must be discarded after 24 hours – so mix only what you need at the time. Sensitised paper also does not keep well overnight so it is best to coat the paper as needed.
2. Under subdued light apply the solution with a brush – some practitioners prefer to coat the paper using a glass rod but I prefer the look that brush coating gives to the edges of the image. It is important that you use a stitched brush, i.e. one whose bristles are not held in place by metal crimping. The metal can react with the solutions giving adverse effects. Japanese calligraphy brushes (Hake) are ideal. Use smooth, even strokes of the brush again in the opposite direction.
3. Let the coated material air dry in total darkness. Do not use heat to dry the paper as it may cause fogging. The coating should dry to a bright yellow.
4: Place the dry paper emulsion-side up and the negative emulsion/ink-side down in the contact printing frame.
Caution: potassium ferricyanide bleaches silver so if the paper surface is not dry, the negative will be destroyed.
5. Expose the coated material for the desired time, handling it with care. Time will vary due to the light source used and the density of the negative but I suggest 20 minutes as a starting point before checking the image. Exposures can take as long as an hour so patience is called for.
6. Developing/Washing/Fixing: After the exposure is completed the print is ‘developed’ in running water, at approximately 68°F (20°C), for about 20 minutes or until the yellow stain disappears. This will clear the highlights. Sometimes the print may look a little dark with the highlights looking degraded and a little muddy. Though it is often best to make a new print, and simply adjust exposure time, mild cases can be corrected by adding two table spoons of distilled clear table vinegar to a litre of water and applying this solution to the wet print to clear the highlights.
7. Intensifier: After the print has been developed it can be treated in a solution of a few drops of Hydrogen Peroxide in 500ml of water. This solution acts as an intensifier and will enrich the cyan colour. Leave the print in the solution for a couple of minutes but do not increase the time because the image will begin to fade. Wash the treated print in running water for 15 minutes and hang to dry.
8. Allow the print to air dry in subdued light.Toning/Staining Cyanotype Prints
Cyanotypes can be toned to produce several different colours. Unfortunately the process of doing so can be a very hit or miss affair. Do not let this put you off as, with a little patience, experimentation and luck, the results can be well worth the time and trouble involved.
N.B.: If your are going to tone prints that you have previously produced and dried, before toning, soak the prints, briefly, in distilled water at room temperature.
Green
Make a saturated, 20ml, solution of Iron (II) Sulfate. Add to this - 4 drops of Sulphuric Acid and then dilute with an equal amount of water (20ml). You should now have 40ml of toner into which the print can be immersed. Once the desired tone has been achieved remove the print and wash in water.
Lilac-violet
Place the print in a solution of borax and water. Wash after the desired tone has been achieved.
Mauve, Grey and Red
This solution will produce all three tones. It's just a question of how long you leave the print in the solution. There are no hard and fast rules to the length of time as there are too many variables. Therefore this has to be done by inspection and it does not always work, but when it does the results can be beautiful. Print darker than usual and then wash for 10 minutes, then immerse in a solution of Copper Nitrate (into which a few drops of ammonia have been added - add drop at a time until the precipitate has redissolved. This bath turns the print first mauve, then grey and then finally red.
Black Toner
Solution A: 3 drops Nitric Acid + 1000 cc. distilled water
Solution B: 14g. Sodium Carbonate + 160 ml. distilled water
Solution C: 14gGallic Acid + 160 ml. distilled water
Soak the print for 5 minutes in water. Immerse it in solution A for 2 minutes. Wash the print in water for 5 minutes. Immerse the print in the solution B and leave it until the image bleaches away and then reappears as a light orange image. Wash the print for at least 10 minutes in water and the place it in solution C. When the image has achieved the required black tone remove and wash for at least 40 minutes in water. Finally allow the print to air dry.
Reddish Brown Highlights with Bluish Grey Shadows
Solution A: 36 g. Tannic acid + 1000 cc. distilled water
Solution B: 18 g. Sodium Carbonate + 1000 cc. distilled water
Solution C: 30 cc. of a 3% Hydrogen Peroxide solution + 1000 cc. distilled water.
Place a presoaked cyanotype in solution A for 2 minutes. Wash for 2 minutes water. The print is then immersed in solution B for no longer than 20 seconds. Remove the print and wash for 2 minutes in water. Now place it in solution C until it gets the desired tone is reached. Finally wash the print for at least 30 minutes in order to eliminate any residual chemical from the print and let it air dry.
Staining in Tea solution
The tannic acid in tea is an excellent means of staining cyanotypes brown. Simply prepare a concentrated tea solution (don’t use Earl Grey) and leave the print immersed in this solution until the desired tone is reached. Wash with plain water for 15 minutes and let it dry.
Caution
Whilst the cyanotype process is relatively safe - like any photographic process a few simple precautions are necessary and all chemicals should be kept out of the way of children and it is important not to have food or drink in the work areas.
Wear rubber gloves. Cyanotype chemicals will stain the skin and clothing.
Do not let these chemicals come in contact with your eyes. If they do, flush eyes immediately with running water for at least 10 minutes and contact your doctor immediately.
If any of the chemicals are accidentally ingested get medical attention immediately. The antidote for potassium ferricyanide is 3% hydrogen peroxide in a dilute solution.
Always clean everything after each session. Clean your hands thoroughly and make sure that all bottles are labeled correctly.
Be sure to prevent acid from coming into contact with any cyanide; such a combination will produce poisonous cyanide gas.
July 2024 Several books, featuring Christopher John Ball's photographs, are now available through Amazon or click on an image below to purchase via secure payments on lulu.com
Tweet